I have to create custom application icons and splash screens for nearly every application I create with IBM Mobile First Platform.
Mostly, I have to work with iOS and Android applications, and I’ve now found a process and a set of tools that makes this a lot quicker.
NOTE: I’ll be concentrating on tools that work with Mac OSX exclusively, as I’m assuming you have access to this for creating your iOS hybrid applications.
Pre-requisites
I’m assuming you have a pre-existing MFP hybrid application project with an Android and iPhone (iOS) environment added to it. For the sake of argument, I’ll assume your project is called “MyProject” and the application is called “MyApp”. This results in a directory structure like MyProject/apps/MyApp.
The following commands will create an appropriate application:
mfp create MyProject
cd MyProject
mfp add hybrid MyApp
cd apps/MyApp
mfp add environment iphone
mfp add environment android
Create application icons
Firstly, create a 1024px x 1024px PNG icon file. You can use whichever editor you prefer for this. Generally, I use GIMP.
Don’t worry about rounded corners or anything – iOS will do this for you automatically, though Android will not. Transparency is preserved if you need it.
Once you have this file, you can feed it into the generation tools to make all the various sizes of icons you need.
Generating Android icons
Head over to makeappicon.com. Drop your 1024px x 1024px PNG file into the toaster. Once your files are “baked”, select the “Android” tab and get the website to email you your files.
Installing Android icons
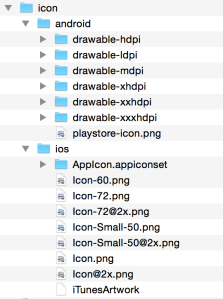
The email you receive will have a ZIP file attached, with the following content:
Each of the android/drawable-* folders will contain an ic_launcher.png file. You need to copy these into your Android resource folder in your hybrid project.
cp -r icon/android/* MyProject/apps/MyApp/android/native/res
Make sure you adjust the command above to allow for your folders’ locations.
Now, adjust your android/native/AndroidManifest.xml file. You need to adjust the application element’s android:icon attribute to read @drawable/ic_launcher, like so:
<application android:label="@string/app_name"
    android:icon="@drawable/ic_launcher">
This tells Android to use the ic_launcher.png files, not the pre-exisiting icon.png files. You can delete the icon.png files if you wish.
Generating iOS icons
You may have noticed that the archive you received from makeappicon.com included iOS icons, but unfortunately it’s an incomplete set. Thankfully, there’s an application that simplifies creation of the full set of iOS application icons, along with iOS splash screens.
Mark Bridges’s Asset Catalog Creator really helps out here. There are two versions; Asset Catalog Creator, and Asset Catalog Creator Free. Later on, you’ll need either the paid-for version (£1.49) or an in-app purchase from the free version (£0.79) to create iOS splash screens. I bought the full version.
Once you have the application installed, start it up and drag your 1024px x 1024px PNG icon file into the drop area, then generate the “iOS icon” asset catalog.
Installing iOS icons
Asset Catalog Creator has now generated an “asset catalog” – this is a really simple way of installing the icons into your iOS application. It also tells you how to install it, but in case you missed it, follow these instructions:
Open the iOS project in XCode. You can do this by opening MyProject/apps/MyApp/iphone/native/MyProjectMyAppIphone.xcodeproj with XCode.
Under the “General” tab in your project properties, find the “App Icons and Launch Images” section. Under “App Icons Source”, click “Use Asset Catalog”.
Choose to migrate existing app icons, and to migrate launch images. We’ll fix this up in a moment.
Drag the Media.xcassets folder generated by Asset Catalog Creator into your project root in XCode. Ensure you check “Copy items if needed” to install a copy of the files.
Click on the Media.xcassets folder. You’ll see several “sets” of resources: AppIcon (your new icons), AppIcon-1 (your old icons) and LaunchImage (your old splash screens). Make a note of the resource set you want to use as your application icons.
Now, go back to the “General” tab in your project properties, and select the correct resource set in “App Icons Source”.
Create splash screens
iOS is easiest and very similar to the iOS icons, so we’ll do that first.
Generating iOS splash screens
You’ll need a 2048px x 2048px version of your splash screen. Asset Catalog Creator can stretch, fit and crop this in various ways to generate all the versions you’ll need.
Using a method similar to that for iOS icons, use Asset Catalog Creator to create a set of iOS splash screens.
Installing iOS splash screens
Drag the generated LaunchImage.launchimage folder into the Media.xcassets folder in XCode:
Now, go back to the “General” tab in your project properties, and select the correct new resource set in “Launch Images Source”.
Generating Android splash screens
Android uses a special image format to create splash screens, known as a “9-patch image”. In the context of splash images, you’re only interested in marking up the “stretchable” areas of your image – you don’t have any content to “fill” the background with.
Take a look at Radley Marx’s guide and Google’s guide on 9-patch images.
There are many alternatives available for creating 9-patch images. I recommend the Android Asset Studio’s Simple Nine-patch Generator for basic splash screens. Alternatively, you could use the draw9patch tool included with the Android SDK.
Regardless, bear in mind that both of these tools are limited in capability when handling large images. I’d recommend a maximum size of 512px x 512px as a starting point.
Make sure you name your images splash.9.png.
Installing Android splash screens
Once you have generated your images using the tool of your choice, copy them into the appropriate drawable-* folders. If you have only one image, replace the drawable/splash.9.png image with it. Otherwise, delete any splash.9.png images you haven’t overwritten.
Conclusion
That’s it! Go ahead and compile your applications. Everything will look lovely.


